
GuidePrep50 Desktop · For Schools

    Run CBT Exams in Your School, No Internet Needed.

    Download the app, then follow this guide step by step: install it, register your school and run your first exam.

    Windows 10 & 11, 64-bit

    • Works Without Internet
    • For Windows 10 & 11
    • Real JAMB CBT Format
    The principal dashboard: School Overview with readiness, at-risk students, readiness by class and weak subjects
    Works Offline
    What It Does

    Everything Your School Needs for CBT.

    • No Internet Needed

      Classroom computers join over Wi-Fi or a phone hotspot.

    • Live Exam Room

      See every student as they write. Add time or unlock in a click.

    • 60404040

      Full JAMB Mock

      180 questions in two hours, on each student’s own subjects.

    • Fair Exams

      Leaving the exam screen locks the paper. Answers are never lost.

    • Readiness Reports

      Know who is ready, who is at risk and what to revise.

    • Automatic Backup

      Saved on your computer, backed up whenever there is internet.

    Before You Start

    One Computer Runs Your Whole Exam.

    Install Prep50 Desktop on one computer, usually the principal’s or the ICT teacher’s. It becomes your school’s exam server. Classroom computers don’t need anything installed.

    Server On
    1. Install on One ComputerIt becomes the exam server for your school.
    2. Connect the ClassroomSame Wi-Fi or hotspot. No internet needed.
    3. Start the ExamStudents sign in and write. You watch live.

    What You Need

    • Windows 10 or 11A 64-bit computer to be the host. It holds your school’s data.
    • About 450 MB FreeThe installer is about 120 MB and needs 434 MB once installed.
    • Internet, OnceTo download the app and register your school. Exams run offline.
    • One NetworkClassroom computers on the same Wi-Fi, router or phone hotspot.
    Install

    Install Prep50 Desktop in Eight Steps.

    Do this on the computer that will run your exams. It takes about five minutes.

    Start by downloading the installerWindows 10 & 11, 64-bitDownload for Windows
    1. 1
      Step 1

      Download the Installer

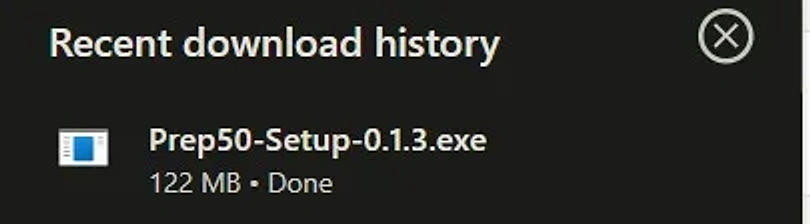
      Click Download for Windows on this page. When it finishes, open Prep50-Setup from your downloads.

      The browser’s download list showing Prep50-Setup-0.1.3.exe, 122 MB, done
    2. 2
      Step 2

      Click More Info

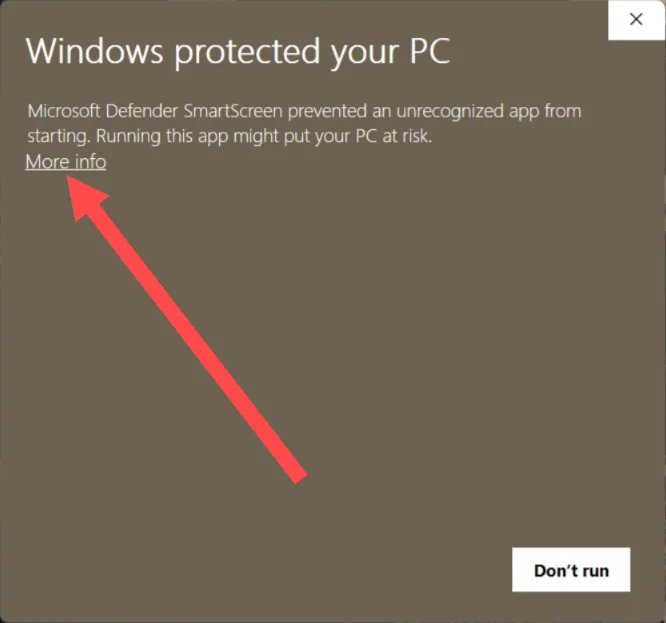
      Windows may say “Windows protected your PC”. Click More info. Do not click Don’t run.

      Windows shows this for new programs whose installer is not yet signed with a publisher certificate. It is safe to continue.

      The Windows protected your PC screen, with an arrow pointing at More info
    3. 3
      Step 3

      Click Run Anyway

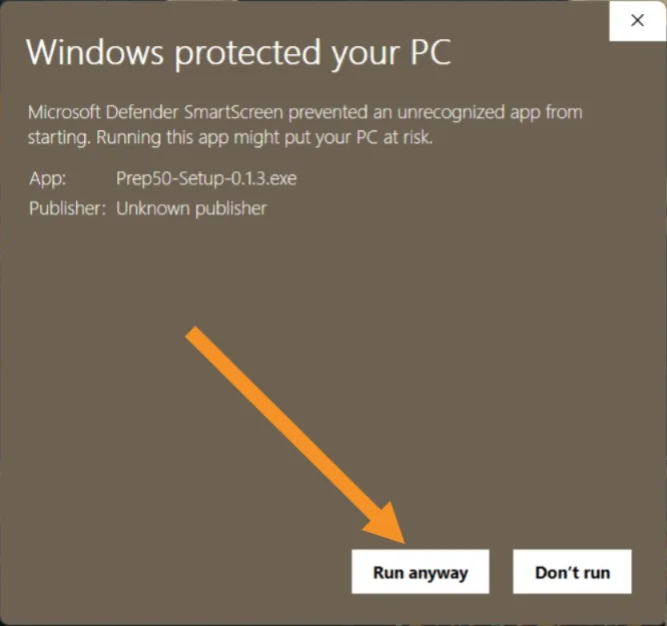
      The screen now shows the app name, Prep50-Setup. Click Run anyway.

      The Windows protected your PC screen showing Prep50-Setup-0.1.3.exe, with an arrow pointing at Run anyway
    4. 4
      Step 4

      Choose Who Can Use It

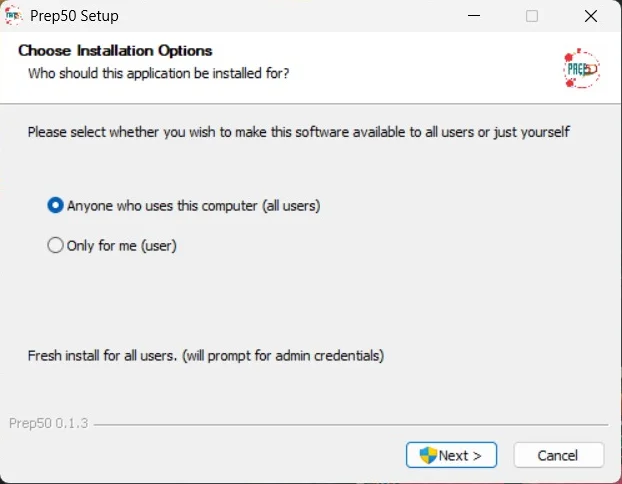
      Pick who Prep50 is installed for, then click Next. Either choice works: it depends on who uses this computer.

      Anyone who uses this computer (all users) suits a shared school computer, and Windows will ask for permission in the next step. Only for me installs it for your Windows account alone, with no permission prompt.

      Prep50 Setup asking who the app should be installed for, with all users selected
    5. 5
      Step 5

      Allow the Changes

      If you chose all users, Windows asks whether this app can make changes to your device. Click Yes. (Chose Only for me? You won’t see this, so go straight to the next step.)

    6. 6
      Step 6

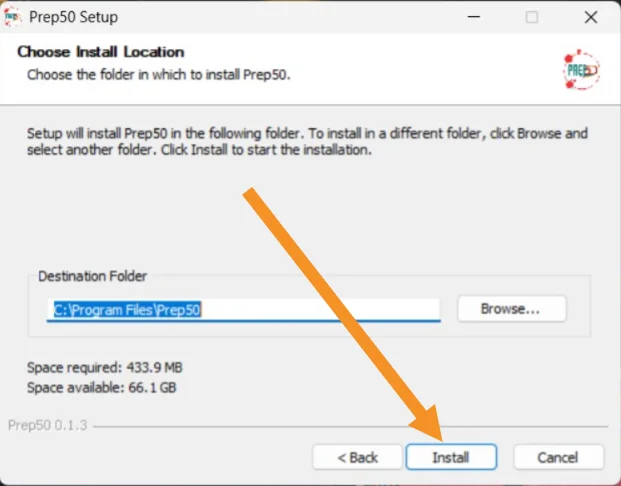
      Click Install

      Keep the folder it suggests (C:\Program Files\Prep50) and click Install. It takes about a minute.

      Prep50 Setup choosing the install folder C:\Program Files\Prep50, with an arrow pointing at Install
    7. 7
      Step 7

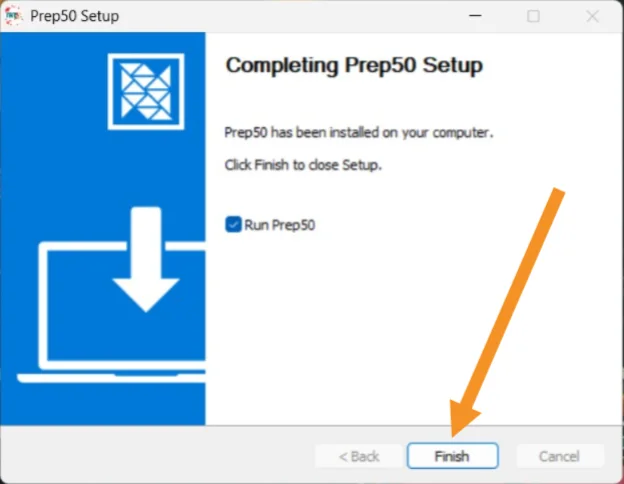
      Click Finish

      Leave Run Prep50 ticked and click Finish. Prep50 Desktop opens on the sign-in screen.

      Completing Prep50 Setup, with Run Prep50 ticked and an arrow pointing at Finish
    8. 8
      Step 8

      Open Prep50 From the Taskbar

      Next time, click the Prep50 icon on your taskbar to open it. You can also find it in the Start menu by typing Prep50.

      Want it always there? Right-click the Prep50 icon on the taskbar and choose Pin to taskbar.

      The Windows taskbar with the Prep50 icon next to Search
    Register and Sign In

    Set Up Your School Once.

    When Prep50 Desktop opens for the first time, register your school. After that, everyone signs in from the same screen.

    1. 1
      Step 1

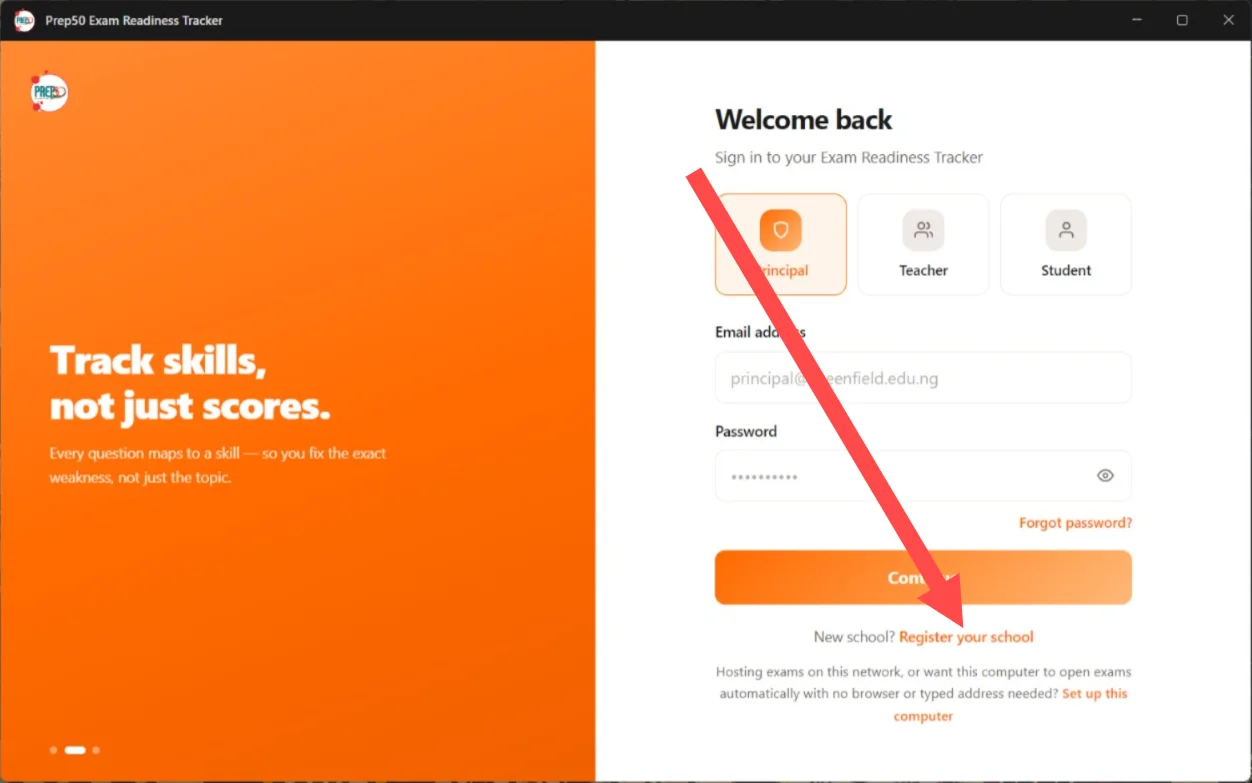
      Register Your School

      For a school new to Prep50: click Register your school under the Continue button and fill in your school’s details. Your school is created on the Prep50 server, which gives you your School ID. Click Continue to go back to the sign-in screen.

      Already on Prep50? Skip this step and sign in.

      The Prep50 Desktop sign-in screen, with an arrow pointing at Register your school
    2. 2
      Step 2

      Sign In as the Principal

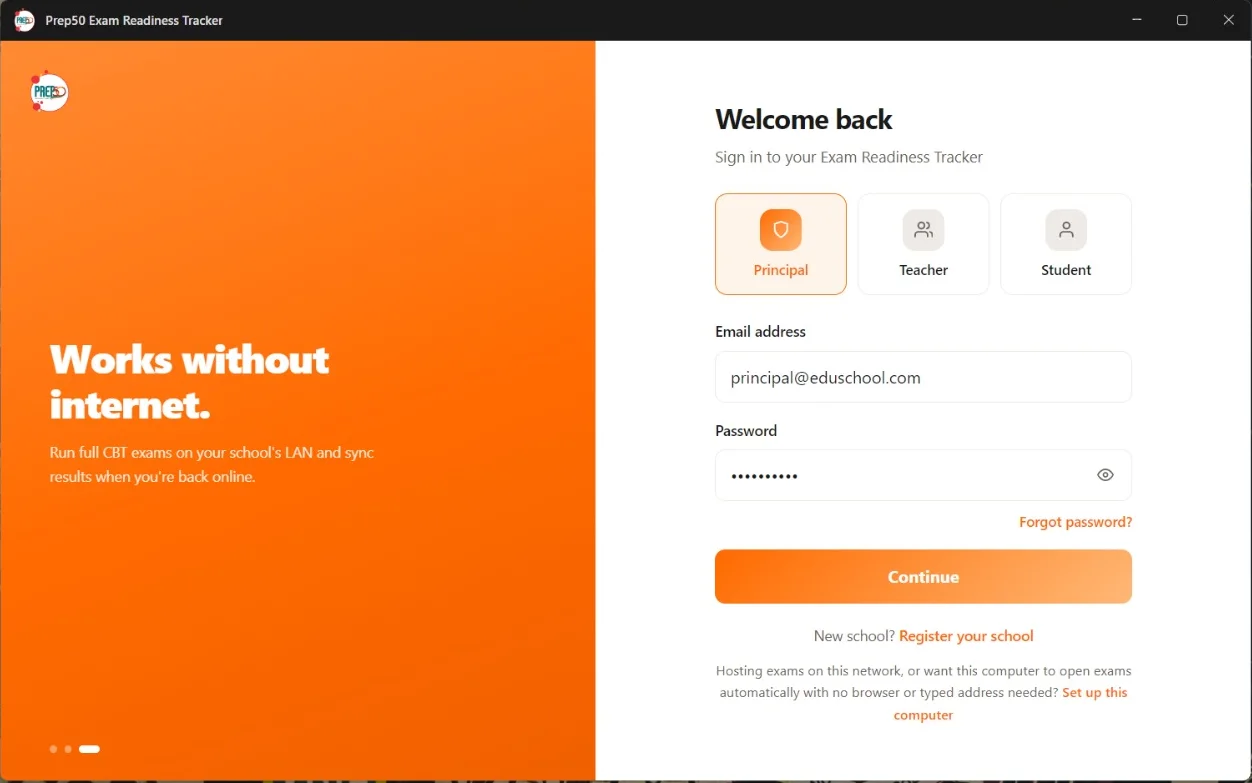
      Choose Principal, type the email and password you registered with, and click Continue.

      The first sign-in on a computer needs internet for a few minutes. The screen shows “Setting up this computer for (your school)” with a progress bar while it downloads your school and the Prep50 question bank, then signs you in by itself. If the internet drops, click Try again: it carries on from where it stopped.

      The Prep50 Desktop sign-in screen with Principal selected and the email and password filled in

    Who Signs In With What

    • PrincipalEmail and passwordRegisters the school and invites teachers.
    • TeacherEmail (or phone) and passwordJoins from the principal’s invite link.
    • StudentSchool ID, Student ID and PINThe teacher gets these when adding the student.
    Using Prep50

    The Screens You Will Use Most.

    The main screens, and what to do on each.

    Principal

    See How the School Is Doing

    The principal’s dashboard is the school overview, and it fills in as students write exams.

    • Overall Exam Readiness, with how many students are Exam Ready, Borderline or At Risk.
    • Readiness by Class, and the Top 5 Weak Subjects and Skills across the school.
    • Your School ID is at the top. Students need it to sign in.
    • Export Report saves the overview as a PDF.
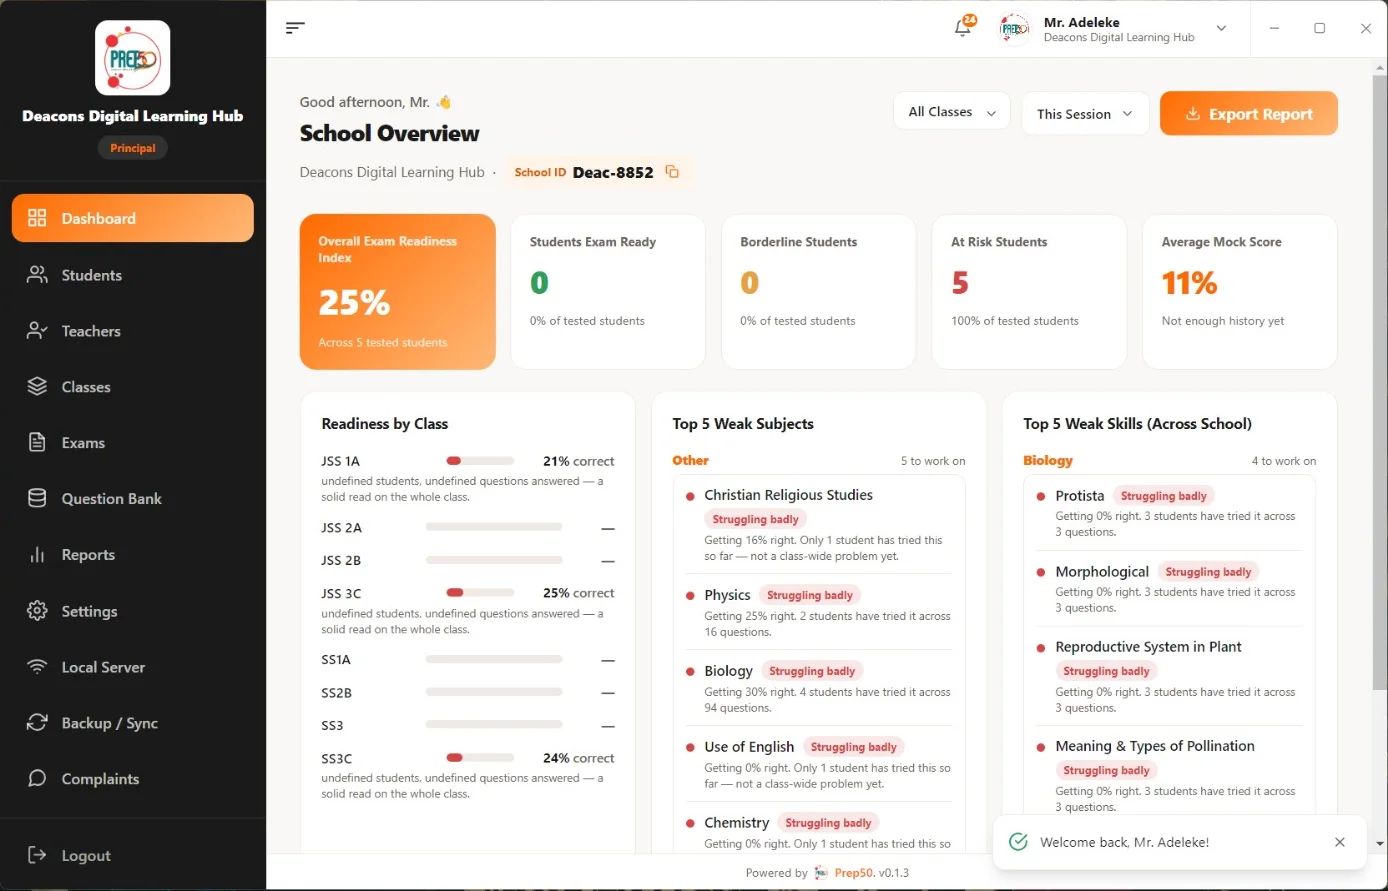
    The principal dashboard: School Overview with readiness, at-risk students, readiness by class and weak subjects
    Principal

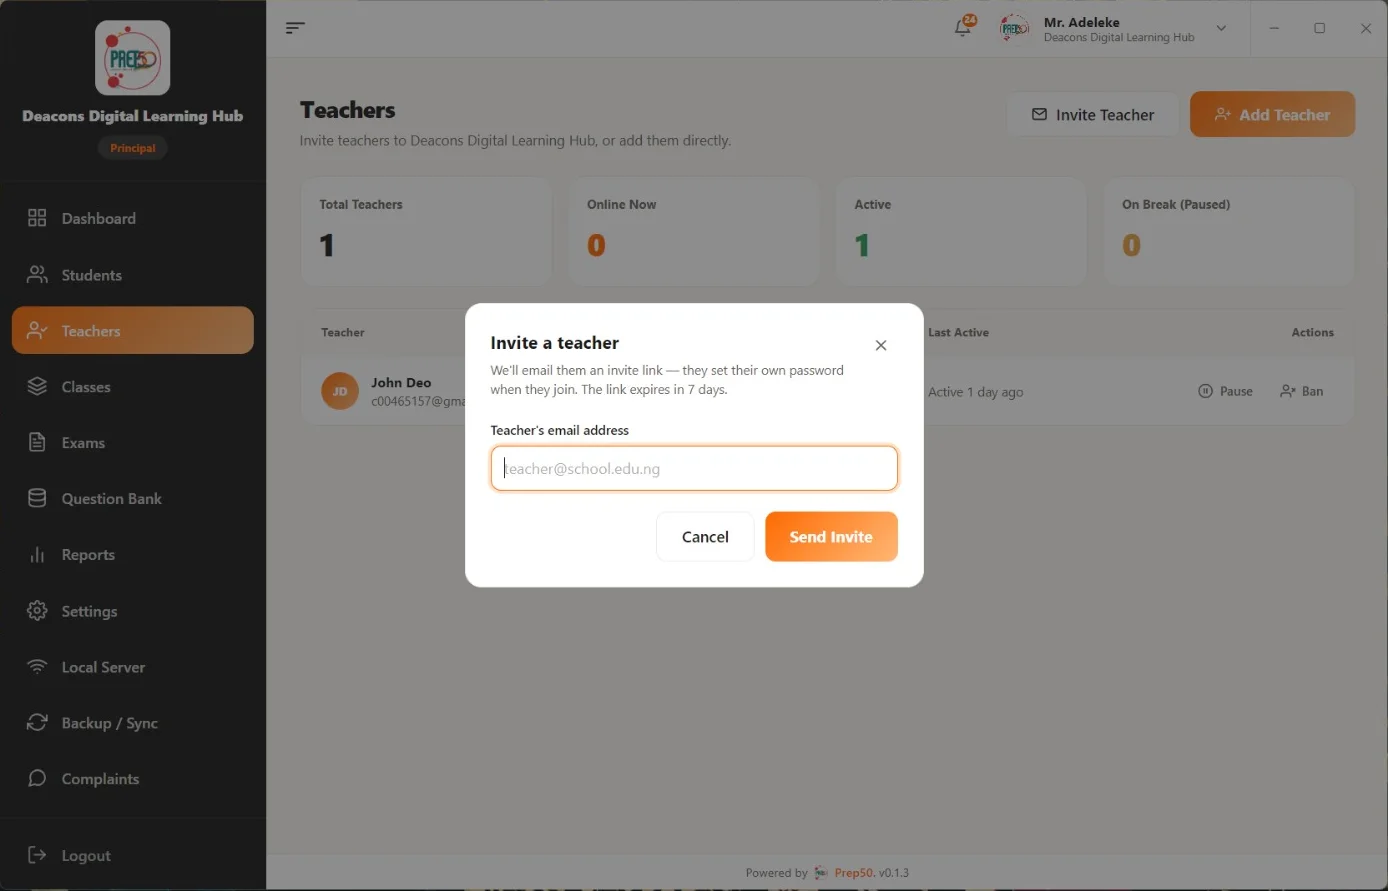
    Add Your Teachers

    Teachers register students, set exams and run the exam server.

    • Open Teachers and click Invite Teacher.
    • Type the teacher’s email address and click Send Invite. The link lasts 7 days.
    • The teacher sets their own password from the email.
    • Or click Add Teacher to register them yourself with a starter password.
    The Teachers page with the Invite a teacher window open, asking for the teacher’s email address
    Teacher or Principal

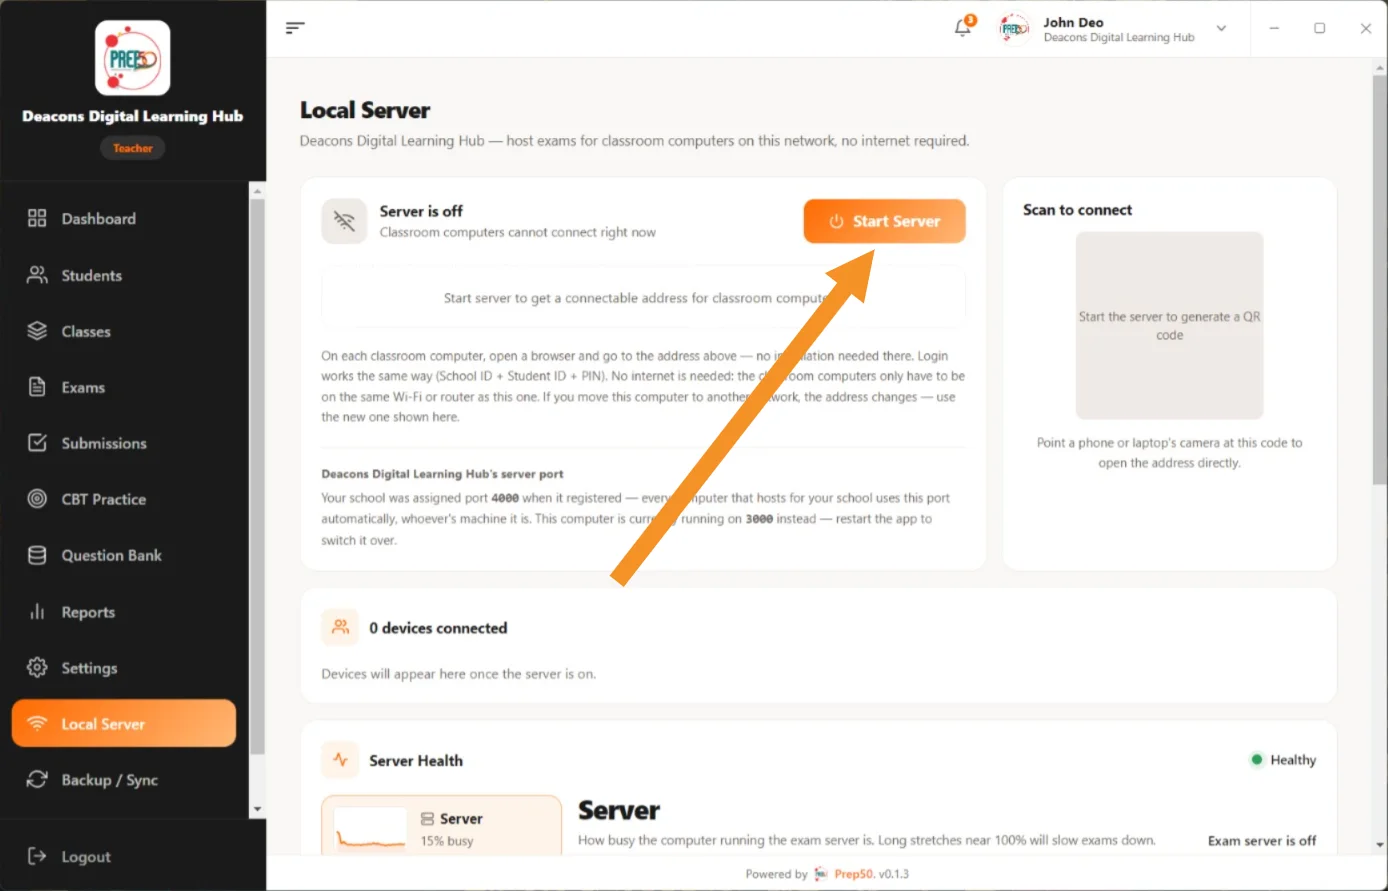
    Start the Exam Server

    This is what lets classroom computers write exams on this computer, with no internet.

    • Open Local Server and click Start Server.
    • An address and a QR code appear. Share them with the classroom computers.
    • On each classroom computer, open a browser and go to that address, or scan the QR code.
    • Students sign in with their School ID, Student ID and PIN.
    The Local Server page with the server off, and an arrow pointing at Start Server
    Teacher or Principal

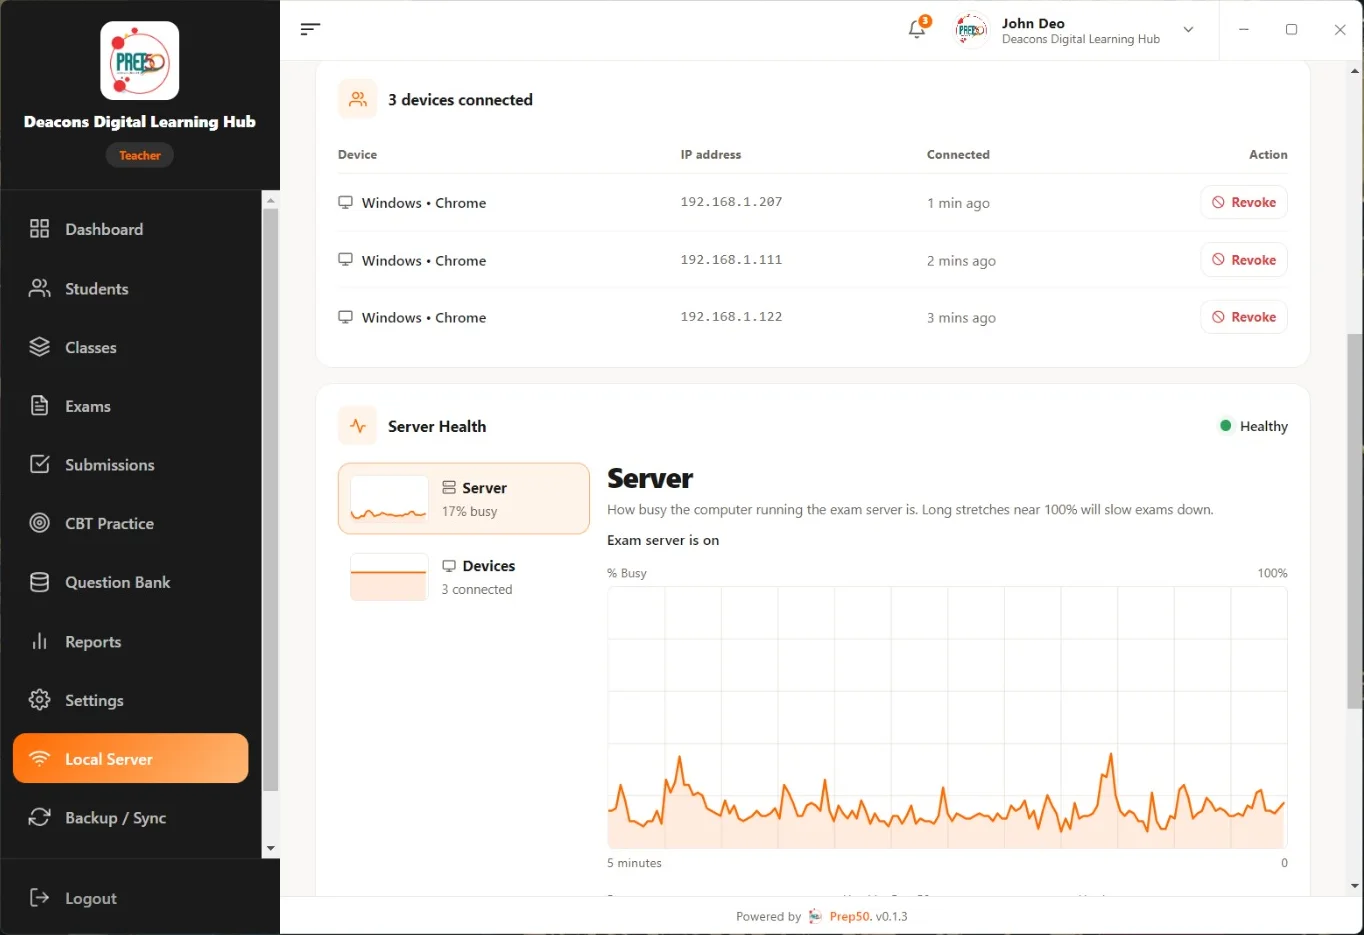
    Watch the Connected Computers

    Once the server is on, every classroom computer that joins is listed here.

    • Each computer shows with its address and when it connected.
    • Revoke disconnects and blocks a computer that should not be there.
    • Server Health shows how busy this computer is. Long stretches near 100% slow exams down.
    Three classroom computers connected to the server, with the Server Health graph below
    Student

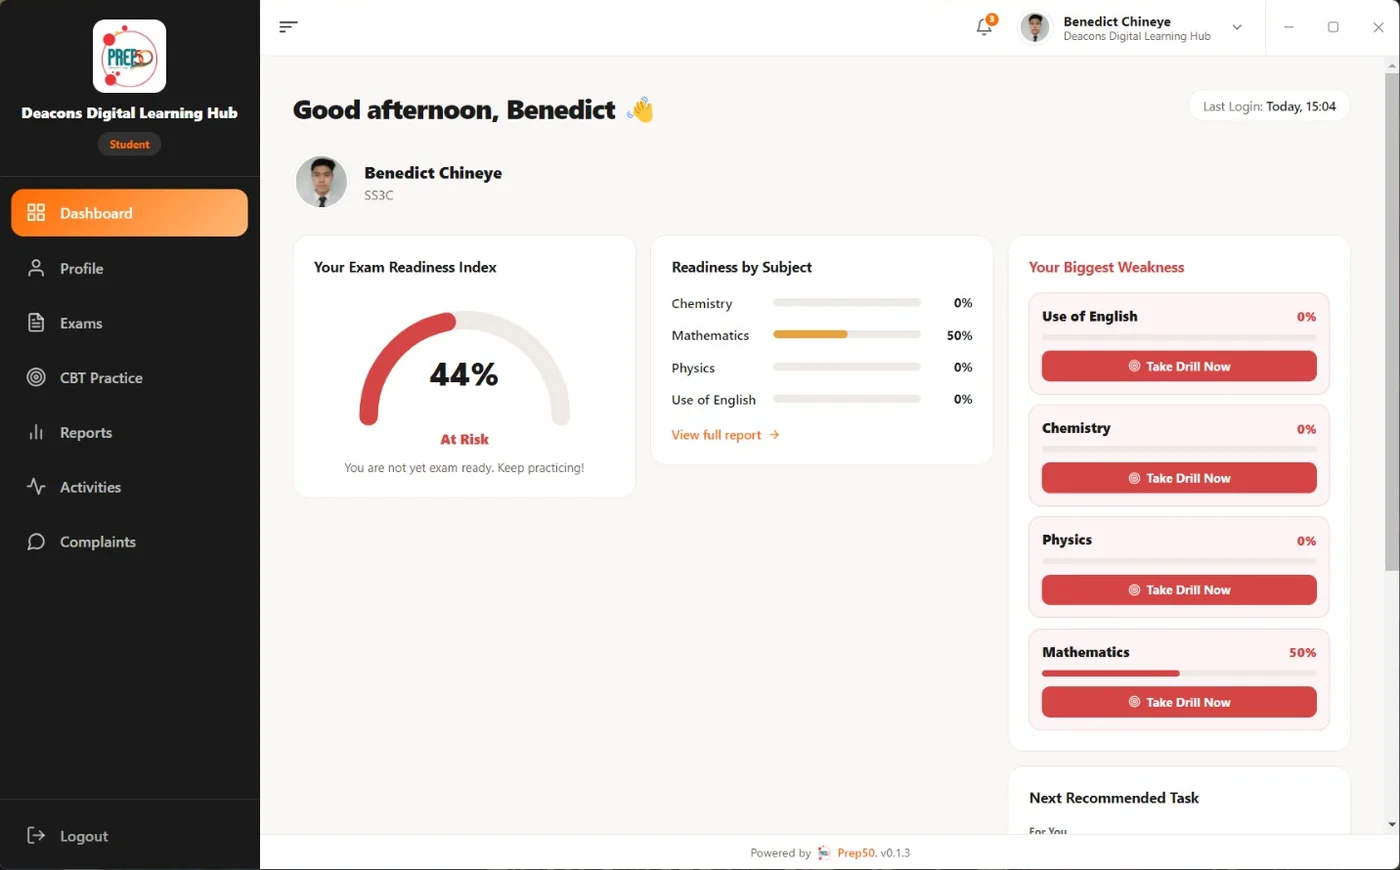
    What Students See

    Students get their own dashboard as soon as they sign in.

    • Their Exam Readiness Index, and readiness in each subject they have written.
    • Their biggest weaknesses, each with Take Drill Now for a short practice.
    • Exams, CBT Practice and Reports are in the menu on the left.
    The student dashboard: Exam Readiness Index, readiness by subject and biggest weaknesses with Take Drill Now
    Teacher or Principal

    Back Up Your Work

    Everything is saved on this computer first. Backup sends a second copy to the Prep50 server.

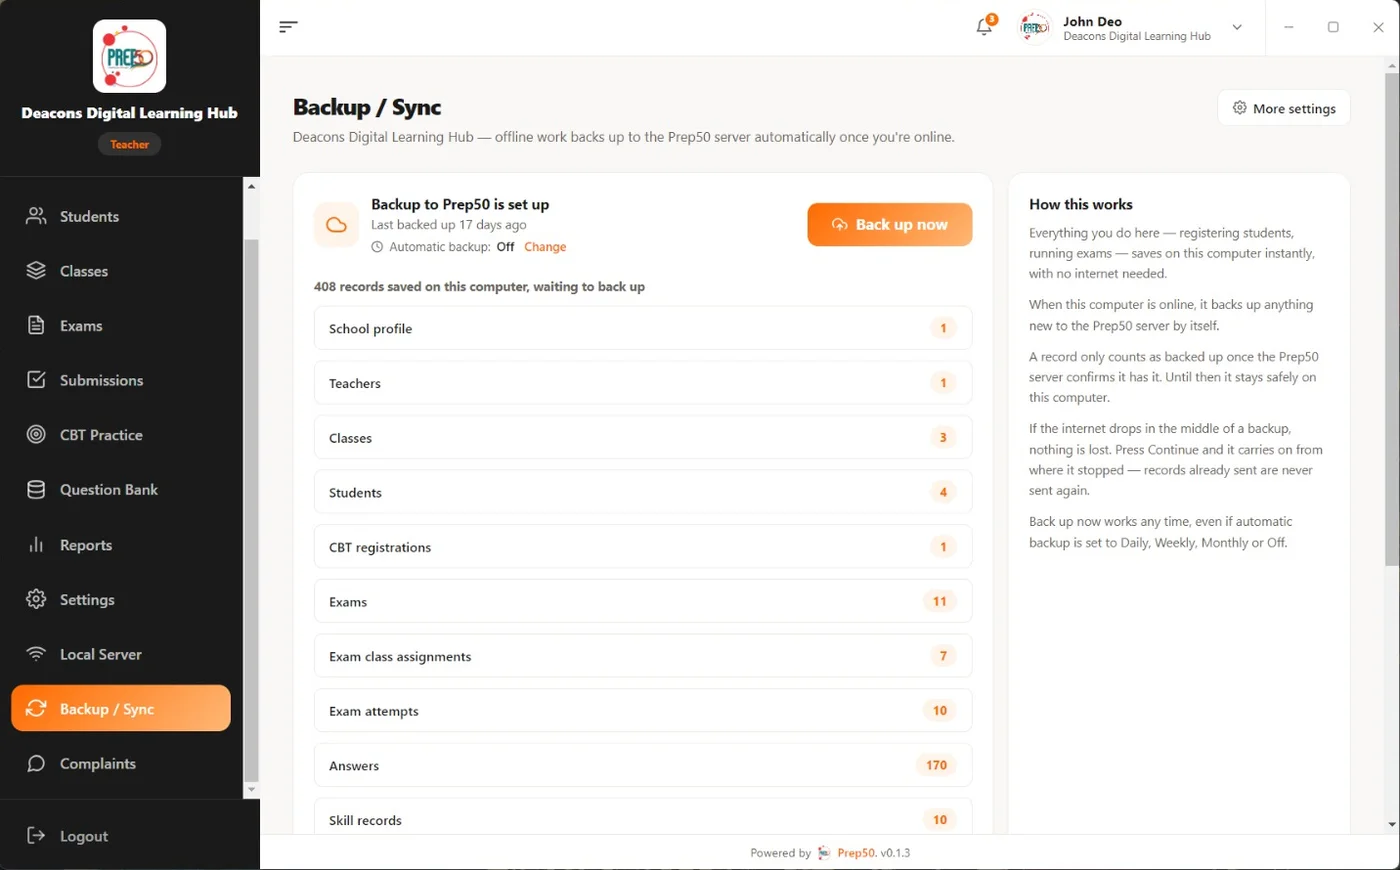
    • Open Backup / Sync to see what is waiting to back up.
    • Connect to the internet and click Back up now.
    • If the internet drops, click Continue later. Nothing is sent twice.
    • Change sets automatic backup: Realtime, Daily, Weekly, Monthly or Off.
    The Backup / Sync page listing 408 records waiting to back up, with the Back up now button
    How To

    Step by Step, for Every Role.

    The everyday tasks in Prep50 Desktop. Click a task to see its steps.

    For Teachers

    Registering students, setting papers and running exams.

      1. 1Open Students and click Add Student.
      2. 2Fill in the name, class, gender and date of birth. Address, email, photo and parent are optional.
      3. 3For the class, pick one of yours or type a new one (for example SS 1A). A new class is created when you save.
      4. 4Save. A Student ID and PIN are created: write them down for the student.

      Capital letters and spaces don’t matter (jss 2c finds JSS 2C), but a different letter is a different class.

      1. 1Open Students and click Bulk Upload.
      2. 2Choose a CSV, Excel, PDF or Word file. The classes in it are created for you.
      3. 3Check every row (scroll sideways: nothing is hidden), fix or remove rows, and type a class into any row that has none.
      4. 4Confirm.

      CSV and Excel work offline. PDF and Word need internet.

      1. 1Open Exams and click Create Exam. The wizard has five steps: Details, Topics, Questions, Settings, Review.
      2. 2Details: choose the type: WAEC, JAMB or Mock. A WAEC exam only uses WAEC questions and a JAMB exam only JAMB questions; Mock uses both.
      3. 3Topics: tick the topics to cover.
      4. 4Questions: choose them yourself (Prep50 Bank or My Questions) or click Pick them for me and say how many.
      5. 5Settings: fill in the start date, start time, end date and end time. Underneath, it says in plain words when it runs.
      6. 6Review, then click Publish, or Save as Draft to finish later.
      1. 1Open CBT Practice, go to the Full JAMB Mocks tab and click Create Full JAMB Mock.
      2. 2Pick the course: Medical Science, Engineering, Arts or Commercial. Any subject short of questions is marked.
      3. 3Check the lengths (60 Use of English, 40 for the others), the time and the pass mark.
      4. 4Leave Everyone on this course, or tick classes to narrow it (for example SS3 only).
      5. 5Click Create and publish.

      Every student sits it on their own four subjects, and each paper is built the moment they press Start.

      1. 1Open CBT Practice and click Create CBT Practice.
      2. 2Pick a subject card, then the week.
      3. 3Click Create practice: 40 questions from that week’s topics are already chosen. Review and publish.
      4. 4Add the Weekend mock: it opens Friday 6am until Sunday and covers what you taught that week.

      A week can be started Monday to Thursday. The next week unlocks once this week’s practice is done and its weekend mock exists.

      1. 1Open Exams (or CBT Practice) and click Live room on the paper. It refreshes every 3 seconds.
      2. 2The tiles show who is writing, locked, connected and submitted.
      3. 3Review Students lists anyone locked out: Let continue (their locked time is given back), Submit now, or Allow move to another computer.
      4. 4Add time for everyone writing gives 5 to 30 more minutes. The ⋮ beside a student adds time for just them.
      5. 5Activity opens the full log: who left the screen, for how long, and on which question.

      If several students “left” at the same moment, the room says so: that is usually a pop-up on the computers, not cheating.

      1. 1In the live room, click Rewrite on a student who has submitted.
      2. 2Choose Only the questions they left unanswered (type the minutes) or The whole exam.
      3. 3The student is told, and their exam card says Start Rewrite.

      Once per student per exam, and not on an Ended exam. Their first result is never changed.

      1. 1Open Submissions, choose Exams, CBT Practice or Repair Drills, then the paper.
      2. 2Switch between Submitted and Not submitted yet, or search a student.
      3. 3Click a student for their full report: score, rank, time and every question.
      4. 4Click Assign Drill on a weak subject to send them a short practice.
      1. 1Open Question Bank and click Add Question.
      2. 2Fill in the subject, topic, question, four options, the correct answer and an explanation. A picture is optional.
      3. 3Need help with the layout? Click Need help? Ask AI (needs internet), compare the two versions, then Apply or Discard.
      4. 4Click Preview as student to see it exactly as students will.

      Anything unfinished is marked Needs completing and is never used in an exam. Upload Questions imports a CSV, Excel, PDF or Word file.

      1. 1The day before, with internet, open Local Server on the host computer.
      2. 2Click Download all pictures (about 33 MB, once). Pause and Resume any time: it never downloads the same picture twice.

      Without this, questions with a diagram show “picture is still loading” during an offline exam.

    For Principals

    Staff, exams and the school’s numbers.

      1. 1Open Teachers and click the teacher.
      2. 2Pause: they can sign in but see only a break screen.
      3. 3Ban: removes them from the school.
      4. 4Send reset link emails them a new password link. Change (on the Email row) updates the email they sign in with.
      1. 1Open Exams. Filter by status (Published, Stopped, Ended), by class, or search the title.
      2. 2On a published exam, click Stop Exam: it pauses for everyone. Nothing is submitted and the clock keeps running.
      3. 3Click Resume to let them carry on, or Live room to watch it.
      1. 1On the Dashboard or Reports page, choose a class with the Class filter if you want just one.
      2. 2Click Export Report.
      3. 3Tick the sections and classes, then click Download PDF.
      1. 1Open Settings.
      2. 2Set the school name and upload the logo. It shows in the sidebar for everyone.

    For Students

    Sitting exams and practising.

      1. 1Sign in with your School ID, Student ID and PIN.
      2. 2Open Exams and click Start Now on the paper.
      3. 3Check your Student ID and click Yes, This Is Me — Continue.
      4. 4Read the three cards (details, instructions, keyboard), then click Start Exam. The clock starts now.
      5. 5Choose answers with A, B, C or D. Move with N and P (or the arrow keys). Green squares are answered, red are not.
      6. 6To submit, click Finish Exam (or press S, then Y).

      Answers save by themselves. Switching to another window for 3 seconds counts as leaving: the first time is a warning, the second locks your exam until your teacher decides. Exit keeps every answer.

      1. 1Open CBT Practice, then My subjects.
      2. 2Pick your course: Medical Science, Engineering, Arts or Commercial.
      3. 3Choose Use of English plus three subjects from that course.

      CBT practice opens from SS2. Change course keeps your old results.

      1. 1Open Reports and choose the paper.
      2. 2See your score, rank, time, and how you did in each subject.
      3. 3Use the Lost marks filter to see every question you lost marks on, with its topic.

      Correct answers are not shown on purpose: the point is to find what to study.

    For Everyone

    New computers, updates and passwords.

      1. 1Install Prep50 Desktop on it.
      2. 2A principal or teacher signs in first, with internet, for a few minutes while the computer downloads the school.
      3. 3After that it works with or without internet, and keeps itself in step with your other computers whenever it is online.

      A student can’t be the first to sign in on a new computer.

      1. 1New versions and new questions download by themselves while the host computer has internet.
      2. 2When one is ready, an Update button appears at the bottom-right of the screen.
      3. 3Click it when it suits you. Nothing you saved is lost.

      If you never click it, new questions still arrive every few hours and the new version installs the next time Prep50 closes.

      1. 1Teachers and principals: click Forgot password? on the sign-in screen and type your email.
      2. 2Open the link in your email within 60 minutes and set a new password.
      3. 3Nothing after a minute? Ask your principal to send a reset link.
    Exam Day

    Three Steps the Day Before. Three on the Day.

    Get the pictures, publish the paper and back up while you still have internet. On the day, nothing else is needed.

    The Day Before

    With Internet
    • Local Server → Download all pictures (once, about 33 MB).
    • Publish the exam.
    • Backup / Sync → Back up now.

    On the Day

    No Internet Needed
    • Host computer: Local Server → Start Server. Keep it on and awake.
    • Classroom computers open the server’s address.
    • Open Exams → Live room to watch the paper.
    Troubleshooting

    If Something Goes Wrong.

    The quick fixes for what schools ask about most. Still stuck? Call or WhatsApp us below.

    • Whoever InstallsWindows says “Windows protected your PC”Click More info, then Run anyway. Windows shows this for new programs.
    • TeacherA classroom computer can’t connectCheck it is on the same Wi-Fi, router or hotspot, and that the address matches the one on Local Server. If a red “Windows Firewall is blocking classroom computers” box appears there, follow its three steps.
    • TeacherA question picture won’t loadOn the host computer, connect to the internet, open Local Server and click Download all pictures. Each picture appears on the students’ screens by itself, with no reloading.
    • TeacherA student’s computer breaks during an examThe student signs in on another computer and carries on after about 30 seconds. If the old one is still on, click Allow move in the live room.
    • TeacherA student submitted with questions unansweredIn the live room, click Rewrite on that student and choose only the unanswered questions (set the minutes) or the whole exam. Once per student.
    • TeacherThe host computer restartedOpen Local Server and click Start Server again. It does not start by itself.
    • StudentA student forgot their login detailsAsk the teacher. Their School ID, Student ID and PIN are on the student’s page, with copy buttons.

    Get Prep50 Desktop for Your School.

    Install it on the computer that will run your exams. It sets itself up for your school.

    Download for WindowsWindows 10 & 11, 64-bit
    Need help setting it up? We will walk you through it.07061412071Chat on WhatsApp